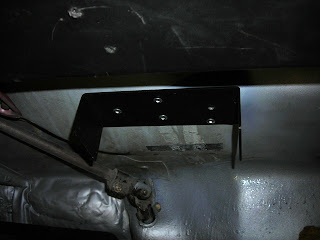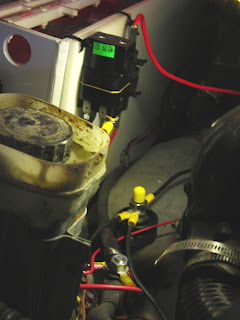
I then mounted the heater on the mount. I made sure when placing the mounting point that the heater did not interfere with any of the pedals or the steering linkage (it's hard to tell from this picture, but the steering linkage is not all that close to the heater blower):

I used 10-gauge red and black wires to deliver power from the 144-volt pack to the heater. I routed them through the original (now useless) windshield sprayer hose grommet:

Next up was work in the middle compartment. I mounted a power post so I could attach several negative cables (the original negative cable from the most-negative point, along with negative cables to the charger and to the heater):

Next, I took the contactor I ordered...

...and mounted it on a piece of polyethylene along with the large fuse which protects the 144V heater circuit:

I hung the board from the middle battery box using tie wraps (also visible in this picture are the three wires going to the negative terminal post):

I then ran a yellow wire from the +12V input to the contactor to the switch location on the dashboard. I also ran a brown ground wire from the contactor to the grounding stud in the gas tank compartment. Note the yellow rubber cap on the negative post - I have a story to tell about that down below...

Here is the switch that will go into the dash to control the heater. The red wire goes directly to unswitched +12V (because I want the heater to be able to run without the key in the ignition). The yellow wire is split to drive the contactor and a relay for the heater blower motor in parallel:

This is the relay - a standard 12V 40A automotive relay, normally open. The yellow wire is from the switch above, the red is directly from unswitched +12V (I used 12-gauge wire since the blower pulls a fairly large current). The brown wire ties into grounding wires behind the dash. The black wire is +12V power for the blower, and the orange wire is ground for the blower:

Here's the wiring around the heater - I wrapped the contacts of the relay in electrical tape (to avoid shorts) and tucked it up above the heater:

It all works pretty well. You turn the switch on, and hot air blows out of the heater. Originally, I was going to attach hoses from that to the original heating system. However, I tried that, and the warm airflow was unsatisfactory. Fortunately, the heater is well-positioned to keep my feet toasty. I may install the flappers that came with the heater so the driver and passenger can independently control airflow.
Last, here is a wiring diagram of the heater circuits. Originally, I had the contactor and relay in series with the switch. However, this led to an excessive voltage drop which meant that the contactor did not close. So, I changed and wired them in parallel as shown here:

Remember the yellow rubber cap on the negative post I was telling you about? This is why it is here. I was tightening the bolts on the most-positive post, but my normal electric-tape-wrapped wrenches (that I use on the batteries) were not the right size for that bolt. So I used just a plain wrench. I managed to brush the top of the negative post while the wrench was touching the positive post. It resulted in a most exciting spark, including blast damage around the positive post and a flash burn on my hand that was holding the wrench:

Moral of the story: be very careful when working with high voltage... If you think you are being careful, think again, and find another way you can be even more careful. I was very lucky not to have damaged myself more than that flash burn on my left hand. I really need to get around to purchasing and installing that high current circuit breaker I've been thinking about...

10 comments:
How did you plumb the air duct? What did it cost? I know Tim had noise issues with the hair dryer setup,how is this? Matt
Matt,
At first, I plumbed the ducting through the original duct holes (where the paper/foil tubes went through from the longitudinal heater tube into the gas anke compartment) - there is just enough room in the driver's side for a 2" air duct (along with all the electrical cables). However, the heat generated that way was rather unsatisfactory. So, I just have the heater blowing directly on my feet (and the passenger's feet). It's somewhat noisy, but not any worse than the original blower (which is still hooked up).
Ross,
Hope it is running well. Any luck with the Watts per mile measurements?
Paul
Nope, have not been driving it for almost two weeks - snow and ice on the roads, along with deicing chemicals (magnesium chloride) - not about to risk my toy on that stuff...
I managed to get a rough estimate - 200 Wh/Mile - at 35mph this week. I found a level stretch of road, and watched the voltmeter (which averaged 140V) and the ammeter (which was pretty steady at 50A). 7000 watts divided by 35 miles/hour gives the 200 Wh/Mile estimate.
I'm nearly done installing a PakTrakr - once that is finished I should be able to get a much better measurement at a variety of speeds.
I have ties at major automotive distributors. If I were able to acquire the basics of street legal automobile. Example: frame, shells Interior & exterior, steering columns, braking. What would the production cost be to enable these vehicles to operate entirely on electric power with a max speed of 80 mph. They would come with no engine components. Please price only one standard ford Taurus for our model purposes.
Also, we would like to set a new standard in vehicle ownership. If there is a chance for a boost unit, that could fill the slot of a gas pump at a gas station this would be beneficial. I have had many talks with major gas station outlet owners of in the Greater Grand Rapids area that would love to facilitate this type of Boost advantage for their customers.
Please respond with your best estimates & forecasts of making this a reality, as we are ready to go full steam at this venture in hopes to stimulate a nation that has seemed to be in a stagnant form .
We are attempting to acquire strategic partners in a venture that will change the Nations gas crisis as we know it. And show other nations that we are on the cutting edge of worldwide movements.
Thank you for your time in review,
Michael Olewinski
michaelolewinski@hybridinvestments.net
wowowowo
This is just the information I am finding everywhere. Thanks for your blog, I just subscribe your blog. This is a nice blog..
Haverland Wall Heater
Thank you so much Love your blog.. ac repair services
Truly an incredible expansion. I have perused this superb post. A debt of gratitude is in order for sharing data about it. I truly like that. Much obliged so parcel for your meet. ftstewart air duct cleaning services
Post a Comment